Localizations in Unity: Part 2
📆 Created on August 20, 2021.In my previous post I explained what localization is and why it's such an important feature for Electric Noir. I showed how I had setup my translations in a Google Spreadsheet to give basic translations for testing and allow translators access in the future.
In this post I'll cover how I wrote a custom importer to create Unity assets from the downloaded CSV files.
Importing Localizations
Having the localizations in CSV format is useful, but it's hard to do fast lookups of strings using just a CSV. I could build out a CSV parser and use that but as of Unity 2018.3 you can create custom ScriptedImporter objects that can handle specific file types and import them into the Unity Asset Database.
First let's start with a caveat. Custom importers can work on almost any file type. Importers are bound to files by their file extension, so if another importer has reserved the extension you want to use, your out of luck. Unfortunately for us this is the case as *.csv is registered by a built-in Unity importer.
Fortunately for us though, we have full control over the files we downloaded, so we can just change their extension to something else that isn't in use. I decided on using *.l10n as my file extension (a common short code for localization), but you can use whatever you want, just be sure to update any of the code you pull out of this series to use the your extension.
Basic Importer Structure
Let's start out with a basic - and empty - ScriptedImporter.
using UnityEngine;
using UnityEditor;
using UnityEditor.AssetImporters;
using System;

namespace GameEditor.Importers {

    [ScriptedImporter(1, new[] { ".l10n" })]
    public class LocalizationImporter : ScriptedImporter {
        public override void OnImportAsset(AssetImportContext ctx) {
        }
    }
}
Alright, this is our basic importer code. All the work is done within OnImportAsset(). This is where we'll get a reference to the localization file that was added or updated and use that to build out our localization assets.
Data Objects
Before we can import anything we'll need some objects (data containers) to hold the data we want to store. We can create these easily enough using ScriptableObject and classes marked with [Serializable].
using System;
using System.Collections.Generic;
using System.Text.RegularExpressions;
using UnityEngine;

namespace Localization.Data {
    [Serializable]
    public class TranslatedTextItem {
        public string Key;
        public List<TranslatedTextValue> Values;

        public string GetValue(string language) {
            foreach (var value in Values) {
                if (value.Language == language) {
                    return value.Value;
                }
            }
            return null;
        }
    }

    [Serializable]
    public class TranslatedTextValue {
        public string Language;
        public string Value;
    }

    public class LocalizationSet : ScriptableObject {

        public List<string> Keys;
        public List<TranslatedTextItem> Values;
        public List<string> SafeKeys;

        private static Regex Cleanup = new Regex(@"[^0-9a-zA-Z]+");

        public TranslatedTextItem GetItem(string key) {
            int index = SafeKeys.IndexOf(key);
            if (index == -1) index = Keys.IndexOf(key);
            if (index == -1) return null;
            return Values[index];
        }

#if UNITY_EDITOR
        private void OnValidate() {
            SafeKeys.Clear();
            for (var i = 0; i < Keys.Count; i++) {
                var key = Cleanup.Replace(Keys[i], string.Empty).ToLower();
                SafeKeys.Add(key);
            }
        }
#endif
}
So this shows how I plan on storing the localization data once it's imported. Each *.l10n file will get imported as a LocalizationSet containing all of the keys and their translated values (TranslatedTextItem). I'll also store a "safe" version of the key - a copy without any spaces or special characters), which can be used later on within the Unity inspector to build out a drop-down selction menu.
Parsing CSV data
Now we can update our importer to include these data objects and start importing the CSV data.
private static Regex CSVParser = new Regex(",(?=(?:[^\"]*\"[^\"]*\")*(?![^\"]*\"))");

public override void OnImportAsset(UnityEditor.AssetImporters.AssetImportContext ctx) {
    var set = ScriptableObject.CreateInstance<LocalizationSet>();
    var keys = new List<string>();
    var values = new List<TranslatedTextItem>();
    var sourceText = File.ReadAllText(ctx.assetPath);
    int idx = 0;
    var headers = new List<string>();
    foreach (var line in sourceText.Split(new[] { "\r\n", "\r", "\n" }, StringSplitOptions.None)) {
        var entries = CSVParser.Split(line);
        if (idx++ == 0) {
            headers.AddRange(entries);
            continue;
        }
    }
}
This code will pull the entries out of the CSV using a regular expression, which is definitely harder to read, but way more reliable than trying to parse the CSV ourselves. Basically, this regex says: split on the comma only if that comma has zero, or an even number of quotes ahead of it.
Also in the code above, the entries in the first row (idx == 0) will be added to the headers list.
Edge Cases
Next we're going to need to pull out the terms and their translations. This is where things get a little complicated because of a few edge cases. Let's explore how each of these affects the solution.
- What if multiple terms/phrases can have the same translation?
- What if the translation contains quoatation marks?
The first one is easy enough, we can just add multiple entries to the first column of our spread sheet like so:
"Dark, The Dark, the Void",Space.,Raum.,Espacio.
Google Spreadsheets will add the quotes around any text value that contains a comma, which is why we have the CSVParser regex, however that regex won't be reliable enough to pull out the sub entries from our first column. We'll need to create a function for that.
private string[] GetSubEntries(string entry) {
    return entry.Split(',');
}
This takes a bit of text, splits it and returns the array of items. This is fine, but what about the quotation marks that Google inserted into the CSV data? Well that's where our second edge case comes in. And we'll create a new function to deal with this as well.
private string[] GetSubEntries(string entry) {
    var text = CleanupText(entry);
    return text.Split(',');
}

private string CleanupText(string entry) {
    var text = entry;
    if (entry.StartsWith("\"") && entry.EndsWith("\"")) {
        text = entry.Substring(1, entry.Length - 2);
    }
    text = text.Replace("\"\"", "\"");
    return text;
}
Putting it all together
Alright, so now we can parse out the multiple terms from the first column and optionally clean up any quotation marks within a given entry. So let's update our importer to use the new code and build out our localization assets.
public override void OnImportAsset(UnityEditor.AssetImporters.AssetImportContext ctx) {
var set = ScriptableObject.CreateInstance<LocalizationSet>();
var keys = new List<string>();
var values = new List<TranslatedTextItem>();
var sourceText = File.ReadAllText(ctx.assetPath);
int idx = 0;
var headers = new List<string>();
foreach (var line in sourceText.Split(new[] { "\r\n", "\r", "\n" }, StringSplitOptions.None)) {
var entries = CSVParser.Split(line);
if (idx++ == 0) {
headers.AddRange(entries);
continue;
}
var subItems = GetSubEntries(entries[0]);
foreach (var e in subItems) {
var item = new TranslatedTextItem() { Key = e, Values = new List<TranslatedTextValue>() };
int colIdx = 0;
foreach (var entry in entries) {
var text = CleanupText(entry);
if (colIdx > 0) {
var lang = headers[colIdx];
item.Values.Add(new TranslatedTextValue() { Language = lang, Value = text });
}
colIdx++;
}
keys.Add(item.Key);
values.Add(item);
}
}
set.Keys = keys;
set.Values = values;
ctx.AddObjectToAsset("LocalizationSet", set);
ctx.SetMainObject(set);
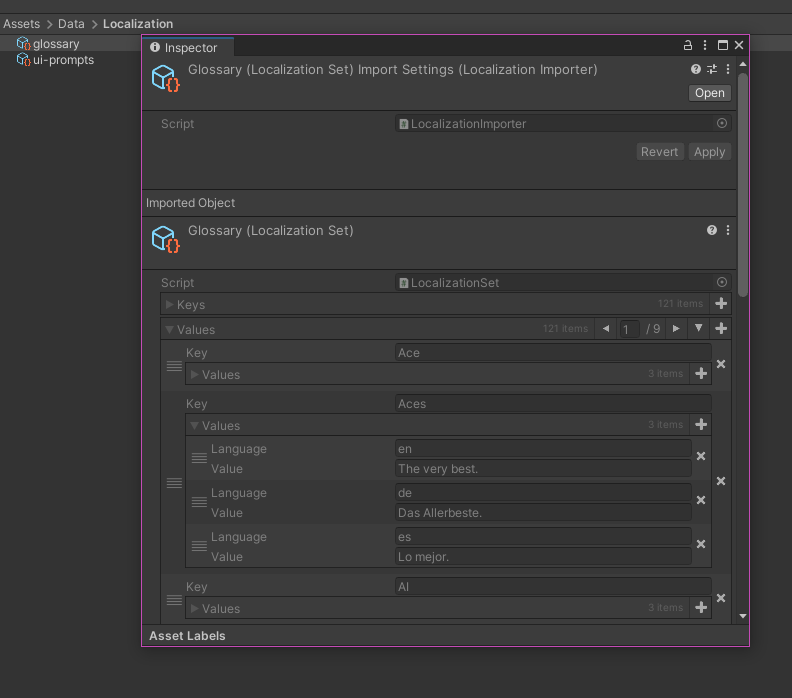
}With this saved in our project we can drag a new *.l10n file into our project and Unity will automatically call our importer which will convert it to a LocalizationSet! Once all that is done, you should see something similar to the images below.
That wraps up part 2, in the next post I'll show how we can bind a localization to a GameObject and get the translated value at runtime.
Until next time! You can always shoot me your thoughts on twitter.